Well, I didn’t go to sleep like I said I was going to, but I did get it working lol. Follow this guide to install the drivers WSL support · dorssel/usbipd-win Wiki To solve the error above I had to install dwarves sudo apt install dwarves but I think that was only because I went ahead and selected pretty much every USB driver possible. I think you also need the mass storage drivers from the link in my last post. If you can’t get it working let me know and I can wipe this WSL install so it’s fresh and only select the drivers that are actually needed. Here’s my config file if you want it though.
.config.txt (111.7 KB)
2 Likes
That is similar to what I experienced. I’m probably also missing dwarves, I will install and try again. Thank you.
I am getting back home. I will try on plain Linux. Record some basic stuff with asciinema like info command + self-test.
1 Like
It turns out my problem was in windows and I needed to move the USB cable to a non-hub port.
Everything looks goodnow, but when I actually attach to the ports with screen and tio there is no output. Just like you’re experiencing.
From what I read last night USB driver support is lacking in WSL. usbipd is a 3rd party program. I don’t think Microsoft initially intended WSL to support USB devices. It’s pretty interesting how it works, it’s actually connecting to the USB device through IP.
Ok, I’ll wipe my WSL and get something going tonight. It was pretty easy once I found that second link but I did have to change some of the commands to match my kernel version. Are you using Ubuntu or one of the other distros?
1 Like
I’m using standard Ubuntu, I didn’t need to compile with options enabled to get to this point.
I have used the bus Pirate with WSL on my previous computer. However, the Bus Pirate may have had different USB ports at that time.
When connecting to the Bus Pirate terminal, the MSD drive detaches and reattaches in read only mode. I am suspicious that may be causing the issue.
Yeah I don’t think there are any mass storage USB drivers at all from what I remember last night. That may be all we need to install then.
1 Like
@ian this is mostly just for you to improve documentation and make writing it easier, right?
Wouldn’t it then be easier if you get yourself a cheap linux workstation that you can connect via ssh or rdp to? For example some cheap and used mini pc.
WSL and USB isn’t the easiest combination to get working due to the overall design of it. And I’m not sure if the time fighting WSL is worth it for this usecase.
Edit: I mean something like this: LENOVO ThinkCentre M900 Tiny PC Intel Core i5-6500T | Windows 10 Professional | Lenovo | gebrauchte Computer | Notebookheaven - Gebrauchte Laptops mit Garantie
There are probably companies selling similar used mini pcs in the Netherlands too.
1 Like
I actually have 3 mini PCs (Thinkstation P340 Micros) in a Proxmox cluster that I run VMs on, which is also an option. But, WSL is easy and most importantly free, so I definitely see the appeal. I use WSL quite often at work and at home. It’s just very convenient to have a Linux shell to fire up quick that has easy access to your windows box (all windows drives are mounted at /mnt/)
2 Likes
I wasn’t happy with the formatting options here, so I put the instructions on a GitHub repo. The only thing I had to install in the kernel was the mass storage driver. I did confirm that it requires dwarves. Let me know if it helps. It seems like a lot, but it really doesn’t take long. You’ll spend more time waiting for the kernel to download and compile than anything.
2 Likes
Wow, thank you so much. This is my first time compiling a linux kernel! It went really smoothly.
I can connect with screen, and indeed the VT100 is awful. However, I am able to log tio sessions and it looks really great.
The only issue with the docs integration is that the timestamp markers aren’t working. Will poke at that a bit.
Where best to use this?
- A basic demo for the main page, getting started pages, overview pages
- Walk through of each getting started page
- Walk through of each device demo
- Demo of commands like flash?
- Suggestions?
3 Likes
Wow, that is impressive.
I honestly think it would be beneficial to use ASCIIenma in any place that commands are being referenced. Many newcomers are onboarding with a Bus Pirate, and this could be a tremendous asset, allowing them to see it working right in front of their eyes.
It could also serve as a sanity check for when their commands are not working as they expected.
1 Like
Thanks for checking it out!
Just noticed the mobile experience leaves a bit to be desired. I’ll see if I can fix that.
1 Like
I agree with kd7eir … compared to static screenshots, having a live “demo” of things working is a great thing. Especially as folks can pause anytime, drag the timeline around even when paused, etc.
The biggest drawback is that there is no scrollback buffer on the ASCIInema window. This makes the near-instantaneous commands (such as ls) difficult to see, before the output is generated.
- Maybe ensure a 1.0 second pause after a command is fully entered, and prior to being executed, so folks can easily jump to the spot where the command being run is easily copy/paste capable?
- Maybe add manual paging pauses when there are multiple pages of text?
Start with the most basic steps. What should a user do immediately upon receipt of their very first busPirate?
- Hold boot button, plug it in and see the bootloader…
- Show how to verify the computer “Sees” the device.
- This may not be ASCIInema for Windows.
- For Linux (not WSL), it can be
lsusbor similar.
- Use
curl/curl.exeto download the latest firmware UF2 from github, and copy it to the device.- Preferably, a “release” version, which kinda requires eventually deciding that a firmware version is worthy of a “release” version tag.
- Reboot and connect with a terminal program.
- Run the self-test … show successful results. But also show a mock-up failure.
- Modify the configuration … doesn’t really matter what is changed, but change something.
- Connect to a simple, widely-available I2C device. Explain what wires need to connect where, like any good tutorial.
- Show all the commands:
- Switch to I2C mode
- Make the beginner mistake … do NOT enable power
- Scan for devices
- Point out the error message, explain that power has to manually enabled, and enable the power
- Scan for devices again
- Use the built-in help for the given command to show usage details.
- Switch back to HiZ mode … and point out that the power is automatically disabled.
This should be a good starting point, with minimal flywire connections (and no plank) required.
It’d be great for each plank to have a similar ASCIInema example of it being used. Even if not perfect, something is better than nothing.
2 Likes
sciine cut -s 36.511845 -i test5.cast | sciine cut -e 9.948405 | sciine maximum 2 | sciine quantize 0.05 0.4 0.2 > test5.json
Using a utility to crop the screencast, set maximum frame length (2 seconds) and standardize any frame > 0.5s and < 0.4 seconds. This give a more natural feel, but could still use a bit of help around the m for mode command.
Also added markers to the timeline, which while not obvious do help explain what is happening if you see them.
On Safari iPhone 16, it flashes by a bit too fast for me to understand what’s going on.
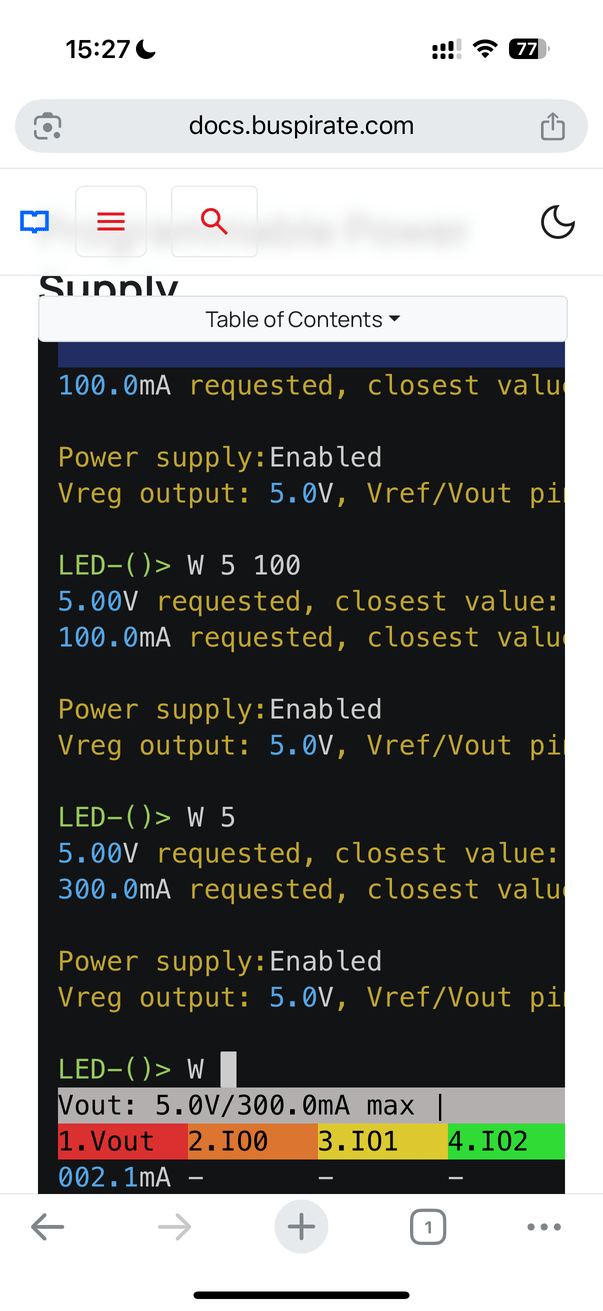
Try this actual staged demo of the PSU, it might be a bit better.
I’m going to make screencasts for the quick start tutorials, then for the master command list per section I think.
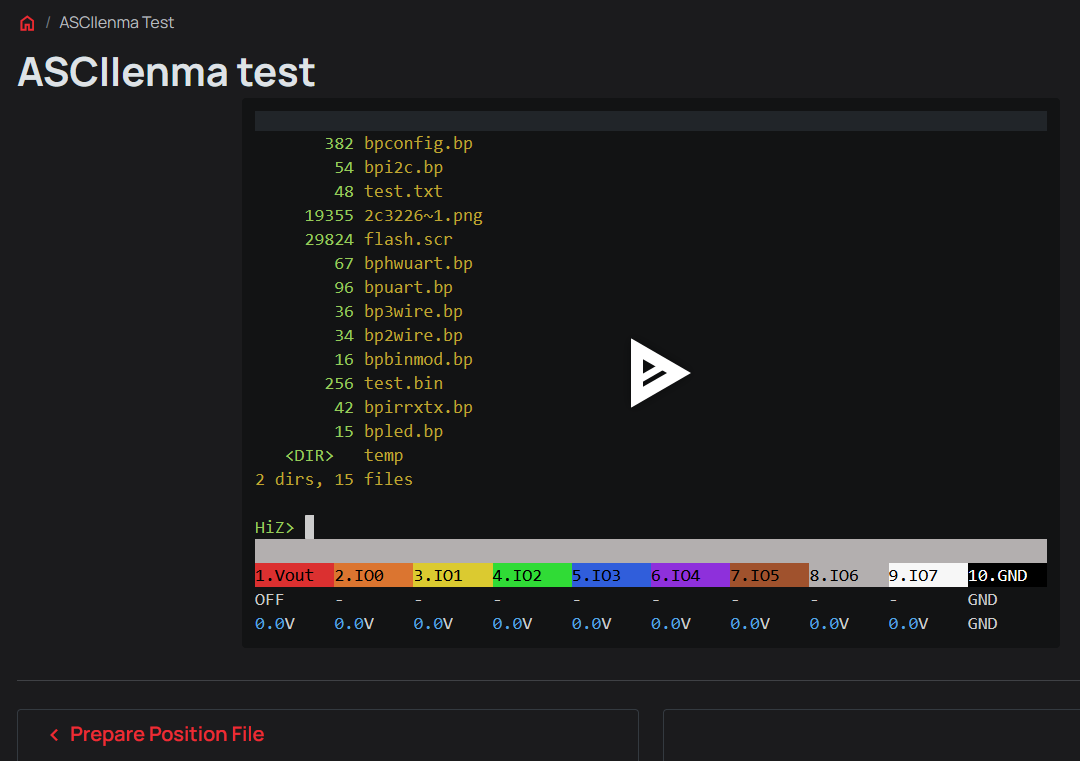
This speed is much better—the only downside is that it’s not very mobile-friendly. As you can see, all the long lines get cut off.
1 Like
I noticed that too. We will need to adjust the CSS and I’m not exactly sure how to do that ![]()
1 Like
Updated screencast here.
Using a utility to crop the screencast, set maximum frame length (2 seconds) and standardize any frame > 0.5s and < 0.4 seconds. This give a more natural feel, but could still use a bit of help around themfor mode command.Also added markers to the timeline, which while not obvious do help explain what is happening if you see them.
That’s nice. Could it still add a 1.0s pause after a command is entered, before enter is hit?
Is there an option for the markers and playback controls to not overlay the virtual terminal playback? It can be difficult to see the markers, and trying to change playback position while paused is unreliable … the interaction sometimes copies text, sometimes drags playback location.
Try this actual staged demo of the PSU, it might be a bit better.
That’s outstanding. I appreciate the slower command entry rate. The only remaining change I’d recommend is a noticable pause (e.g., 1.0 seconds) after the command is finished entry, prior to being executed, if possible.
![]() Very nice indeed!
Very nice indeed! ![]()
2 Likes